Starfish Reviews is a powerful WordPress plugin for review generation. It’s got a lot of excellent features baked right in, and lots more coming in the near future (exciting stuff coming ya’ll!). But there are a number of cool features it already has, that aren’t as obvious. We get asked about these things a lot, so I figured I’d write a post highlighting some of the most useful items from our documentation, that you can’t easily do right from the Starfish Reviews interface.
Here’s the cool customizations & features we’ll be covering:
- Change the Design of Funnels with Custom CSS
- “Embed” Funnels in Emails or Anywhere On the Web
- Track Who Uses the Funnel with the “ID” Parameter
- Hide the License Key & Account Information on Client Sites
- Remotely Deactivate Your License From a Website
1. Change the Design of Funnels with Custom CSS
Most websites are highly customized to match the branding, color scheme, and overall feel of the business or individual they’re representing. Your funnels’ design should be customizable too, right? That way they can match the rest of your site, or the page/post they’re embedded in using the shortcode.
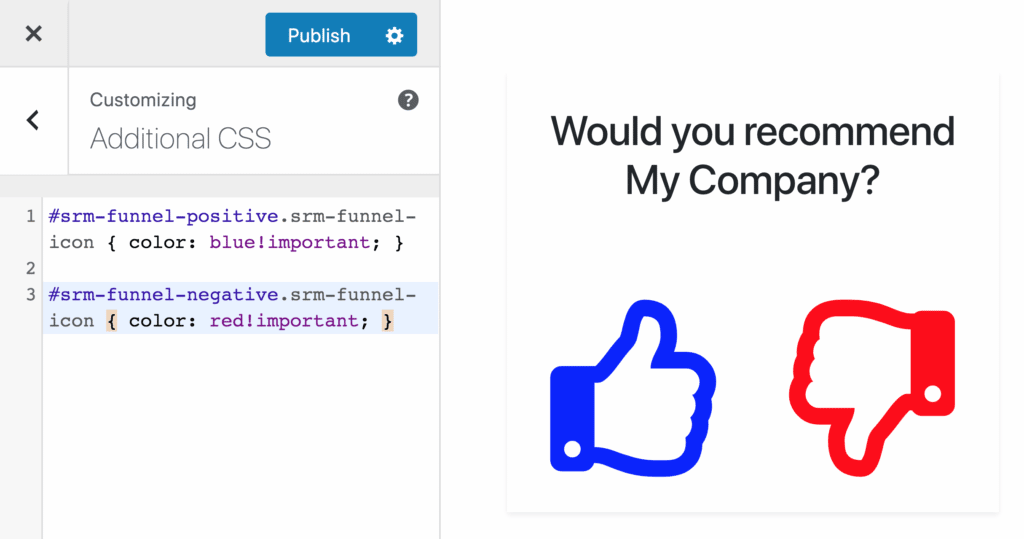
Starfish Reviews funnels are easy to customize using Custom CSS. Here’s a few quick examples of custom CSS you can add to make your funnels your own. The easiest way to do this is add the following CSS snippets in the Customizer under “Additional CSS” (usually near the bottom of the sidebar).
A. Change the Color of the Feedback Buttons
Do you wish the thumbs up/down (or smilie, etc) buttons were different colors? That’s easy, just use this custom CSS to change the colors to whatever you want:
#srm-funnel-positive.srm-funnel-icon { color: blue!important; }

#srm-funnel-negative.srm-funnel-icon { color: red!important; }
You can insert almost any color encoding in place of “blue” and “red” above. For example hex codes are probably most common, such as: “#FF0000” (red) and “#0000FF” (blue).
B. Adjust the Size of the Logo
Want the logo to display larger in the funnel? Or even smaller? That’s an easy one as well, just use this CSS and adjust accordingly:
.srm-funnel-logo img { max-height: 200px; }The height of the logo is what limits it’s size for the most part. So increasing the max-height to “200px” allows it to display larger. You can adjust it even larger by increasing that, or shrink it by decreasing it.
For more CSS snippets and a detailed guide for how to use them, see the full documentation.
2. “Embed” Funnels in Emails or Anywhere On the Web
You can build a funnel and link to it from your email marketing campaign, or from a non-WordPress website. More clicks = more friction. “Friction” is the steps, the process, the hassle, that your users have to go through to accomplish whatever it is you want them to do.
So in this case, clicking the link in the automated email (in something like MailChimp or MailPoet) to get to the funnel is an extra step and additional friction that we realized we could help eliminate. We wanted to help you increase your conversions (people leaving positive reviews). So we built in a way to pre-select the positive and negative feedback options in a funnel when you link to it.
A. Build The First Page of the Funnel
Here’s how you do it: in your email (or non-WP website) create your own version of the first step of the funnel. So you’ll put a title that says something like “How Do You Feel About My Business?” and then insert a couple of icons for their reply. Or they could even just be words like “Great” and “Terrible”.
B. Use the “?feedback=” Parameter for the Feedback Links
Then you’ll link each of those buttons or words to the funnel, but on the end of the positive response link, you’ll add ?feedback=p. On the negative, add ?feedback=n.
So if the link to your funnel was https://mybusiness.com/feedback/funnel1/, you’d link the positive response icon/link (thumbs up) to https://mybusiness.com/feedback/funnel1/?feedback=p, and the negative response icon/link (thumbs down) to https://mybusiness.com/feedback/funnel1/?feedback=n.
Now when people click your feedback links, they’ll be taken to the funnel, but with that feedback option already pre-selected. Instead of clicking once to get to the funnel, then again on either of the feedback buttons, you’ve eliminated a click! That’s a big reduction in friction, which means a better experience for your reviewers, and more conversions (positive reviews) for you or your client’s business. See the full documentation for more details.
3. Track Who Uses the Funnel with the “ID” Parameter
We thought people might want to be able to track who is submitting their funnels, so we added the “ID” parameter that can be added to the links you send people. The funnel will record whatever you put as the ID. So you could use it for general segmentation.
A. ID for Segmentation
For example, you could send one group of a clients an email asking for a review with “?id=group1” on the end of the link, and another group with “?id=group2”. That way you can A/B test your email and see which group responded to the email better. Or perhaps you just wanted to send a different message to the two groups, based on the products or services you provide them. In either case, you get data to see which group responded most, as well as which tended to respond more negatively or positively.
B. Email as ID on Email Marketing Platforms
Alternatively, you can use the ID parameter to identify each individual person that submits the funnel. Here’s how you do it: you use your email marketing platform’s built-in shortcodes to insert the subscriber’s email address or other identifier, as the ID. Side-note: this method may not be GDPR (or other privacy law) compliant. It’s up to you to ensure your emails and funnels are compliant with your local privacy laws.
MailChimp
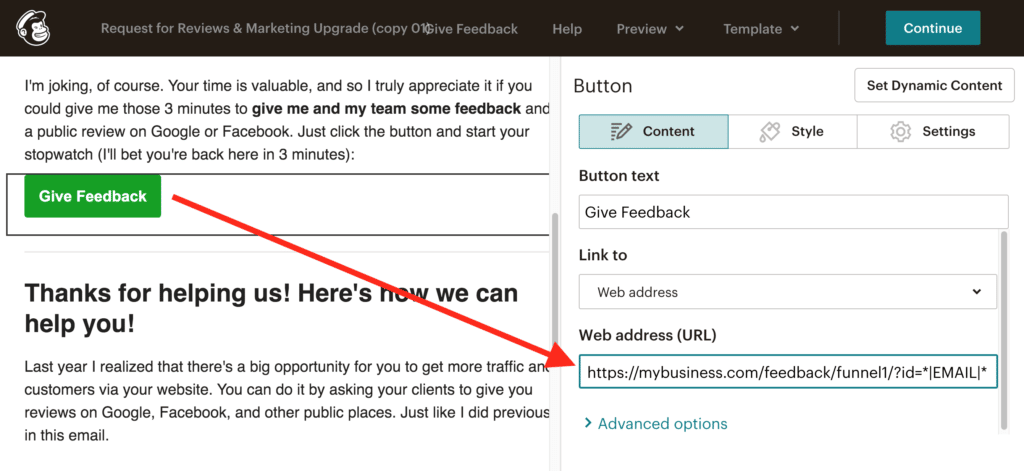
Since MailChimp is one of the most popular (but not our favorite), we’ll use them as one of our two examples. Their shortcode to insert the person’s email address is *|EMAIL|*.
So to set that as the ID for your funnel, you’d add ?id=*|EMAIL|* on the end of the funnel URL. Using our previous example funnel URL, that means the link to the funnel would look like this: https://mybusiness.com/feedback/funnel1/?id=*|EMAIL|*.
MailPoet
Another popular email marketing platform is MailPoet. It’s especially popular among WordPress users, because it’s a WP plugin, and so only runs on WP. MailPoet is a lot simpler than MailChimp and other options, but also more deeply integrated with WordPress, WooCommerce, and other popular plugins. That makes it easier to setup automated emails when you post a new blog post, add a new product, or someone signs up for your product or service.
The MailPoet shortcode for the person’s email is [subscriber:email]. So you’d add ?id=[subscriber:email] to the end of the URL for your funnel. The resulting URL to link to your funnel would look like this: https://mybusiness.com/feedback/funnel1/?id=[subscriber:email].
Other Email Platforms
If you use any of the other email platforms out there, you can do the same thing with them. You just have to find their shortcode for the recipient’s email and set it as the ID on the link to your funnel. We have a few more examples, including SendinInBlue and Drip, in our documentation.
Another cool thing is that you can combine it with the “feedback” parameter from 2.B above. So you can link the positive and negative feedback buttons in your email and include the ID parameter in both. That reduces friction, and records the ID to identify who submitted the funnel.
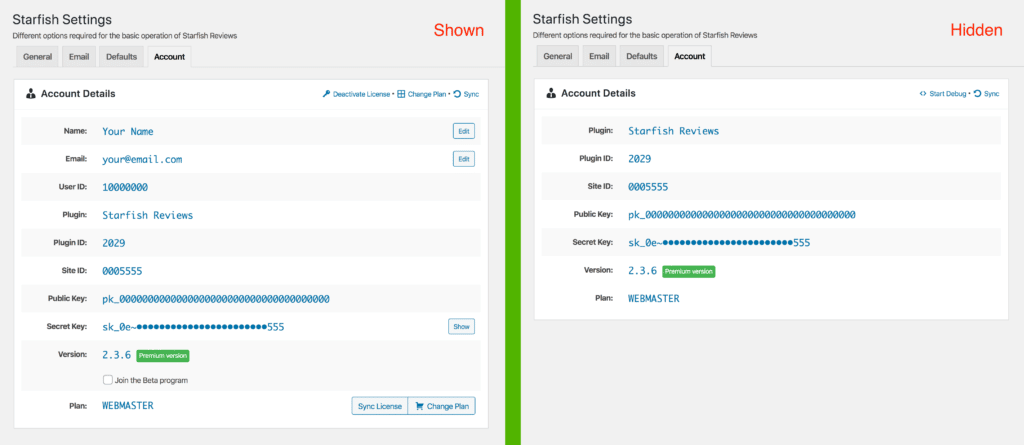
4. Hide the License Key & Account Information on Client Sites
Most of our users with the Marketer or Webmaster plan are installing Starfish Reviews on their client’s sites. By default, Freemius (our licensing and ecommerce partner) shows all of your account information including your license key on the Account page of the plugin. That’s no good if you’re reselling Starfish Reviews as a product or service to your clients. You don’t want them to be able to get your license key or other account information.
Fortunately Freemius heard us, and all of you, and built the ability to hide account information in to their SDK and account dashboard. So that means that it’s pretty easy to hide your license key and account info. And perhaps the best part is that you don’t have to login to each site to do it! You can do it all from your Starfish Reviews account dashboard.
A. Hide Account Info on All Sites
The quickest and easiest way to hide your account info, is to just hide it on all sites using your license key. Do do that, follow these simple steps:
- Go to “Licenses” in your Starfish Reviews My Account Dashboard.
- Click on the license you want to protect in the main area (there’s likely only one).
- A new pane with details for this license will open to the right. Scroll to the bottom.
- Click the “⬜️This license is activated on my client(s) sites(s).” checkbox at the bottom.
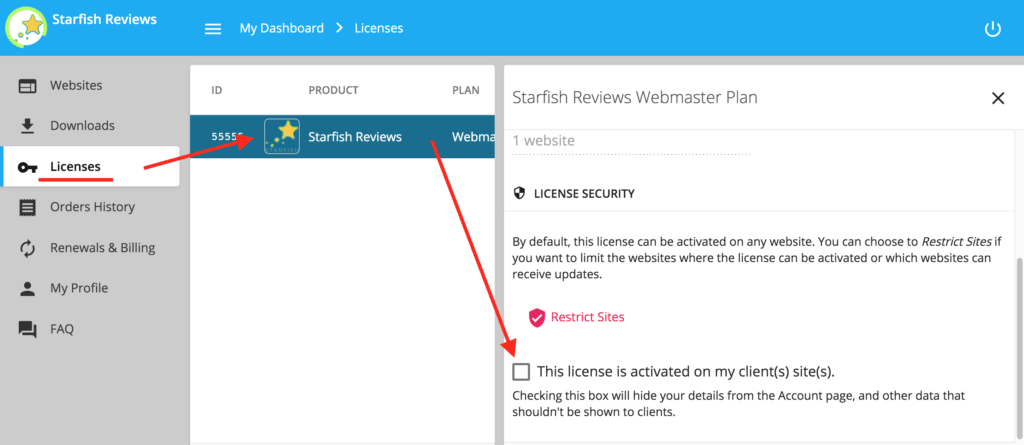
That’s it! Now all sites using your Starfish Reviews license key will hide the license key and other account information within 24hrs.
B. Hide Account Info on Individual Sites
If you’d like to only hide your Account Information on only certain sites, you can do that too. The process is almost the same, but you go to “Websites” in your account, and then select the individual sites one at a time. Then check the same checkbox as above on each one. Or if you hid the account info on all sites (see above), you can reveal it on particular sites, by unchecking the box per-site. Full details are in the documentation.
5. Remotely Deactivate Your License From a Website
Now that you’ve hidden your account info from your client’s sites, what happens if one of those clients cancels their business relationship with you, and locks you out of their site? You can’t go in and remove Starfish Reviews from their site, so what do you do?
It’s actually pretty simple. Thanks to Freemius, just like hiding account info on a client’s site, you can also remotely deactivate your Starfish Reviews license key from their site. This will limit them to the features of the free plugin (on WordPress.org). That means only 1 funnel, with limited features, and no Feedback data. Here’s how you can do that:
- Go to “Websites” in your Starfish Reviews My Account Dashboard.
- Click on the site you want to deactivate your license on.
- A new pane with details for this site will open on the right. Click the “Deactivate” button.
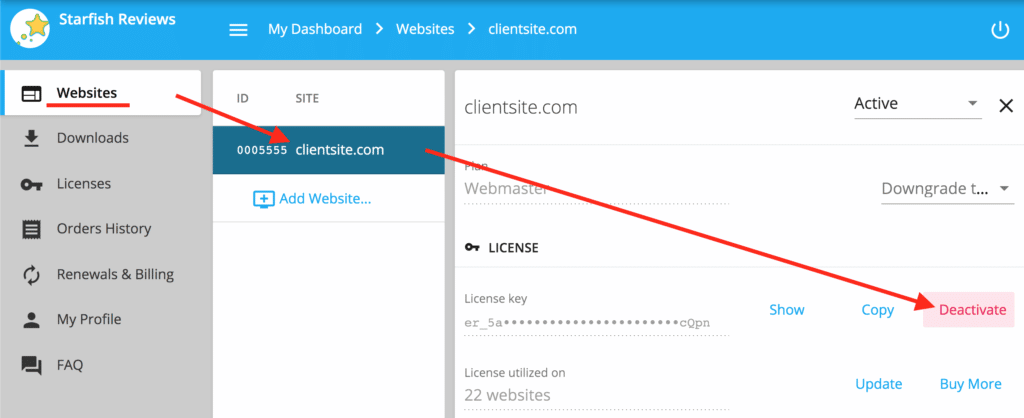
It’s really that easy! Between the ability to hide your account info, and deactivate your license remotely, you really don’t have to worry about clients firing you but keeping your Starfish Reviews license and continuing to use it. More details including a video of how to do this are in the documentation.
Did You Find These Helpful?
So there you have it: 5 cool tips to a better Starfish Reviews experience, whether you’re changing the look and feel, integrating with email or non-WP websites, or just managing access to your license.
Which is your favorite tip from this list? How have you used these? Any other tips you’d like us to post about in the future? Let us know in the comments.


0 Comments